
Nearly every time I kick-off a new Python project, I follow the same set of steps:
- Fire up PyCharm,
- Grab a coffee,
- Click
New Project...->Create, - Create
src(source code) andtestdirectories, - Right click these directories and set to
Mark Directory as Sources Root - Copy the
Licensefrom my last project, - Generate
.gitignorewith the.ignoreplug-in, - etc.
And then I feel about ready to grab some lunch or call it a hard-worked day at the office. Each time I follow these steps, I have realized that this should be automated. In fact, the only non-automatable part is coming up with a name (although, why not automate that too?).
This is where cookiecutter Python library comes in. The principle is quite simple: build a project, replace any variables (e.g., the project’s name) with template markers, and whenever you want to use it, replace the template markers with the desired value (e.g., pointless_grape).
cookiecutter uses Jinja2 as its template engine. A templating engine allows the creation of form which can be automatically filled in later. For example, we might want to make personalized birthday cards:
from jinja2 import Template

template = Template('Hi, {{name}}! Happy {{age}}th birthday!')
data = [
    ('George', 18),
    ('Granny', 92),
    ('Greg', 43),
]
for name, age in data:
    print(template.render(name=name, age=age))
This will produce the output:
Hi, George! Happy 18th birthday!
Hi, Granny! Happy 92th birthday!
Hi, Greg! Happy 43th birthday!
Okay, so maybe they’ll realize that those weren’t personalize — but that’s not the point. With cookiecutter we’re applying this process to an entire project.
In my case, I only want the project name, and perhaps the author (a good idea if anyone else wanted to use it). I start by creating the project I was planning on building in PyCharm, in the tiresome, old, non-automated fashion.
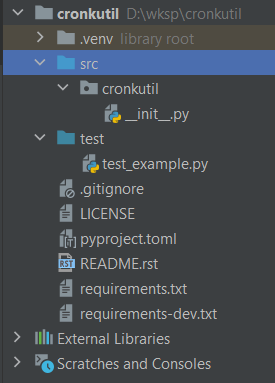
My project, called cronkutil, has all the configuration I typically begin a project with. I then copied everything (except the .venv folder — this shouldn’t be included) to a separate directory. This includes the .idea folder since I wanted to retain the setting of src and test to Source Roots (though I only retained the modules.xml and cronkutil.iml files).
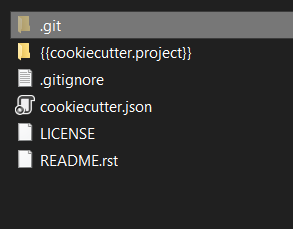
I then globally replace my name with {{cookiecutter.author}} and my package name with {{cookiecutter.project}} — importantly, this must include the names of the files themselves. Thus, the directory under src is changed to a directory called {{cookiecutter.project}}.
Then, I placed all of these altered files into a directory called {{cookiecutter.project}} alongside a cookiecutter.json file. This file describes which variables appear in the template along with any default values.
{
    "project": "test",
    "author": "Me!",
    "python_version": ["3.7", "3.8", "3.9", "3.10"]
}
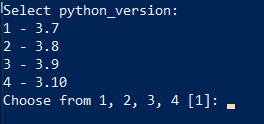
I also added the Python version which will update the {{cookiecutter.python_version}} in both the README.rst and pyproject.toml files. Including a list will let me choose the value I want with a number (and I ordered them from small to large so that I could consistently associate the same number with the same version).
I then prepare the project to be added to github with a license, readme, etc.
Once the project is pushed to github (or, anywhere, really), we can then use it to kick-off a new project. I use a global virtual environment where I installed cookiecutter (pip install cookiecutter) so I activate it and simply run:
cookiecutter https://github.com/name/package.git
which is also abbreviable as:
cookiecutter gh:name/package.git
cookiecutter will walk you through each of the template options specified in the json file and then generate the new project. See more usage details here: https://cookiecutter.readthedocs.io/en/1.7.2/usage.html#grab-a-cookiecutter-template
Also, there are many cookiecutters available to try out — some large and impressive ones for Django, Flask, or see the simple one I created here: https://github.com/dcronkite/default_python_cookiecutter
Having cut my usual cookie, I tell PyCharm to open the directory, and everything looks exactly right. It prompts me to initialize a virtual environment, and now I’m ready to get working.